Thursday, December 16, 2021

Heavy weather and Storm jib rigging.

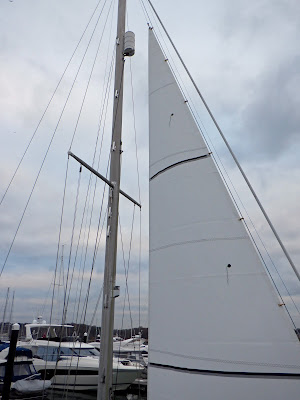
With calm weather on Wednesday I was able to check the fit of the new heavy weather jib.
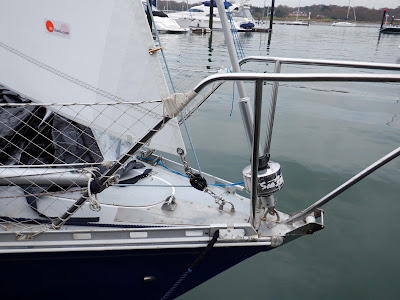
The Dyneema inner forestay (reeved through the original starboard
jib halyard sheaves) is tensioned from below with 4:1 tackle going
 back to one of the 23:1, 2 speed winches at the aft end of the cabin roof.
The stay, block and snap shackle have break loads of more than 2 Tonnes
the shackle on the tackle is a weak link to protect the rest.
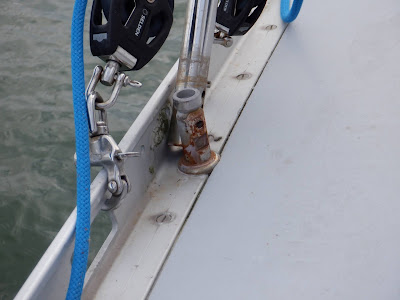
I added the u-bolt for this and to attach the main preventer for maximum leverage.
The heavy weather jib is normally hoisted with the
spinnaker halyard (removed for the winter) rather
than the wire genoa halyard.
The stay should clear the furled headsail but I can move the tack back a little if necessary. I was cautious when I measured up, particularly to clear the radar reflector. The sail is 12.1 square metres, looking at in place I could probably have had it made c10% bigger by lowering the clew a little and lengthening the luff and leach but this way at least the foot should clear of waves.

Sheeting


The genoa sheets need to stay on the sail when the heavy weather or storm jib is in use, previously I had a block on the toe rail and a non adjustable tweaker to narrow the sheeting angle, that was not going to work well with a larger sail likely to be used fairly often, I therefore put a dedicated block ahead of the genoa sheeting track, the sheets go back to the large spinnaker winches on the cockpit coaming, the port one via the toe rail to get a better angle onto the starboard side of the winch. 

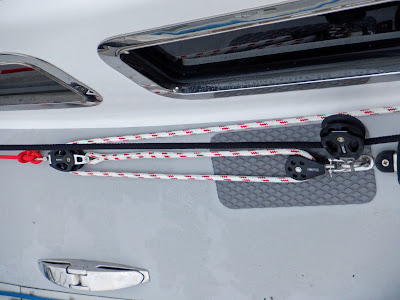
A low friction ring is used on a barber hauler system with a three part tackle going back to a cam cleat on the side of the coach roof. The front block goes to the bottom of main shroud and attaches with a  snap shackle so that when not in use it can be clipped to the mast keeping the tackle clear of the walk way. The loose part of the dedicated set of sheets go into a bag on the mast.
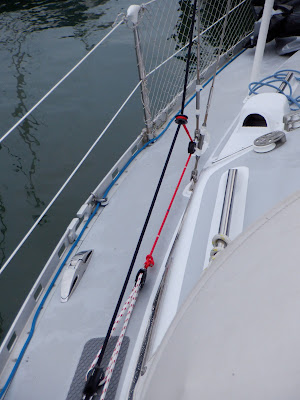
The Barber hauler set up. It should not need to be
hauled in this much, note the whippings at intervals
to speed set up.
Sheet block on the right just ahead of the genoa sheeting track.
The "Treadmaster" pad intended for steps, protects the deck from
the blocks and should reduce any noise if they move.
Leaving Fowey for the Fal, 2023 with just the
heavy weather jib, later the wind was gusting F7
.
More on storm jibs etc can be found on my earlier piece "Storm Jibs".

Tuesday, December 14, 2021

Tom Cunliffe on Docking in a Tidal Stream, with just a glimpse of Sancerre


Tom Cunliffe does some very good videos, the last one is for beginners or perhaps those unused to going onto a pontoon with a tide flowing. It also gives some idea of what the River Hamble is like, just bear in mind that it goes on for over two miles above the fuel berth shown and although the boats are not as numerous all the way up, apart from around several more large marinas (each with up to c350 berths + dry stack and river moorings), the moorings are almost continuous on both sides of the river with up to 8 parallel trots. That adds up to an awful lot of boats.

And if you concentrate there is a glimpse of Sancerre on her mooring, but blink and you will miss it!

https://youtu.be/UCzxRbEV618

Saturday, November 20, 2021

Rebuilt bin locker and a repair.

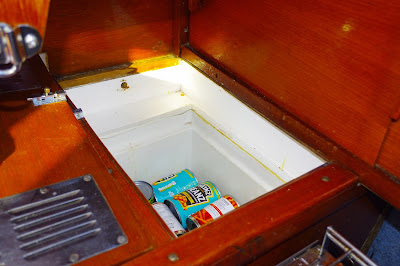
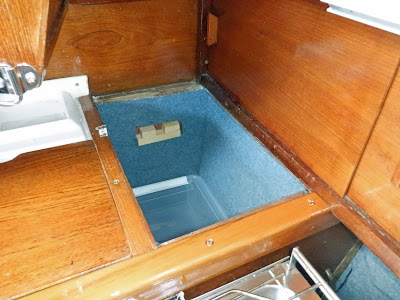
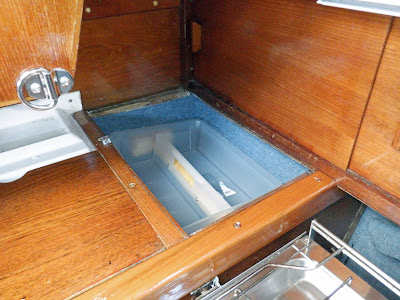
Sancerre once had a built in and very inefficient electric cool box aft of the cooker, this was not working when I bought the boat and probably had not for years. With all of the insulation and voids around it a lot of space was being wasted.

Lots of wasted space.
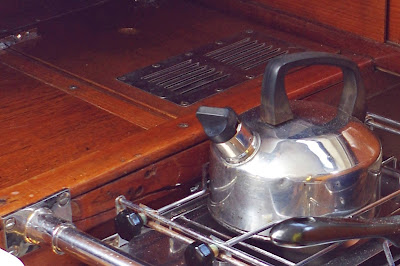
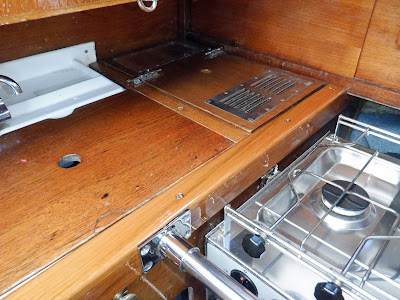
Replacing the fuel tank and moving the water tank (see previous posts) meant working under the sink unit so I decided to sort this out at the same time.  The capping piece on the front / top of the unit had been damaged by a previous cooker so that could also do with replacing.
A big crack & unsightly holes in the Teak capping piece.
Lots more space, the bin is hardwood marine ply, epoxy coated
on both sides with carpet to deaden sound as things move about.
 The timber blocks support a tray for ready to use items, fresh veg etc.
The new Teak capping pieces cost more than the rest of the job together, even sourced as simple planed all round (PAR) timber to a standard size, fortunately I have a bench router to round the edges saving machining costs.

Job done and looking better. The cup holder is a little lower than
before and out of frame.

Wednesday, October 27, 2021

New guardrail stanchion bases

The boat had new stanchions when I bought her but they have never worked correctly leaving me with slack guardrail lines. 

Once I had tightened it up the main bolt and put on a lock nut (omitted by the yard) the base was stable but however much you tighten up the connection between the stanchion and the base it went slack in no time.

One of the 8 stanchion bases.
Fortunately I found that the stanchion was a standard 25mm so I was able to put this fitting over the top of the original.
Four of the stanchions were fixed on the first visit before near
gale force winds and some rain made it too much like hard work.
Naturally it was not that simple, the one I used for testing I purchased a couple of years ago for the cooker crash guard (see pic in the previous post) and it was a nice snug press fit. This batch were very slightly smaller and needed a serious lump hammer to get the stanchion in, but I ended up with a nice rigid stanchion and tight guardrails.

Friday, October 8, 2021

Replacing the Cockpit Locker Floor, Part 3 + Installing the new Fuel Tank.

Day 1 of the installation and the floor is in but not secured, the new water tank and plumbing was done and the water pump & filter moved.


Day 3 and the job is almost done, just the other part of the slide bolt
needs to be found and fixed (its reused).
I thought for a moment I had specified the tank to be a little too long or too high but with a great deal of fiddling and even more swearing it went in. The floor is screwed down all round and the softwood sections forward and inboard are fixed sideways so the whole lot should stay in place in the event of an inversion.

The lashing points are for fuel in cans, probably a max of 40 Litres in 10 Litre cans as my 20 Litre jerry cans are too tall, leaving no room for buckets to go in on top. That is somewhat less than previously but the tank effectively holds 10 - 15 Litres more than the old one which partially compensates and in total will still give 70 hours endurance, in reasonable weather that would be at 5.5 - 6 knots and 385 - 420 NM range (or quite a bit more with a clean hull and / or in dead calm waters).
I fitted a new fuel filter with a clear lower section and drain in case of water contamination. The original filter is in the engine compartment and would be almost impossible to get at when at sea unless it was dead calm, not good if you got the fuel bug. The fuel bulb made bleeding the system dead easy. The engine started immediately although I want to run it for another 30 minutes before leaving the mooring, just in case.

The big electrical cable is from the fuel sender to a NMEA converter so fuel level can be displayed on the plotter and one of the wind instruments.

The rope hanging down (see also the 2nd pic) is my method of securing the locker from thieves and backing up the latch in heavy weather, the end of the tackle goes to a cleat inside of the boat, a similar system runs to the Lazarette hatch covers.
On my last sail I finally found one of the leaks into the compartment which appeared to be from the bilge pump, but when I got it out I found that when the new mainsheet track was fitted (before I got the boat) someone had drilled through the bilge pump outlet pipe so on the odd occasion I used it bilge water sprayed out, but unless the hatch was open which would be rare because you would normally sit on the hatch when pumping, you wouldn't know. Fortunately there was enough slack so I cut off 6" and refitted.

Update 6th November.

Unfortunately it didn't work. Last week I decided to do a long running test (rather than the 10 minutes or so after installation) and the engine stopped after 10 - 25 minutes on several tests. It appeared that the bulb primer was the problem.

Ron (a fellow Achilles owner and serial restorer) consulted with Roger (Dehler 41, "Blue Magic") who immediately recognised the problem which happens on some trucks, the solution should be to have the bulb vertical with the flow downwards so that gravity would help open the non return valve. The bulbs pump fuel best the other way up but does pump in all positions.

Unfortunately that didn't work, the Yanmar 2GM20's low pressure pump is just not powerful enough to open the valve on that brand of bulb (Osculati), this creates a vacuum in the fuel system and the engine stops. The first fuel filter is now connected directly to the tank and on the first test of the engine ran for an hour before I got fed up with diesel fumes blowing into the boat.

So a device to save a few minutes once a year when the engine is serviced or if it runs out of fuel, cost me a day and a half and a 160 mile round trip to the boat 😞.

Update Early December:


Even the above did not work properly, after a week of non-use the engine failed after 10 minutes but then ran for an hour after bleeding. This was getting serious and needed to be fixed quickly as I had to motor a couple of miles upriver to be lifted out on the 17th. I remove the old fuel filter, tap (there just might have been an air leak from the tap although it was not a joint that I undid and there was no fuel leak) and all extraneous pipe. It can't now get any simpler for a tank with a top take-off. It worked, I test ran for an hour a week later before moving to the RAFYC pontoon and again a couple of days later before going upriver and no problems. But I think I'll run another 15 -20 minute test as soon as the boat goes back in the water, which in any case is recommended procedure after a winter lay up.

Update March:

The new pipe work etc. retained fuel for 3 months of non use and after a 20 minute test I motored down river with no problems.

Monday, October 4, 2021

Replacing the Cockpit Locker Floor, Part 2.

The new fuel tank arrived earlier than expected but typically the timber was rather later, but it is now built and ready to go.

New cockpit locker floor built to support the new fuel tank and cover the new water tank. The plastic rulers under the tank are there to ensure that the tank will not sit on any water that pools under the tank and allows any water that might get in to drain away into the bilge (the drain holes are not visible).

Three bolts press against timber spacers
to help locate the tank firmly in place at
the base.
The floor has to support a heavy stainless steel tank with 70 Litres (almost 70 Kg) of fuel in it and another c30 litres in cans. And do that in a heavy sea. It also has to hold the tank, cans and at least part of the weight of a full water bladder tank (which is up to c 40Kg) if the boat turns up side down. That would not have the same shock loading as a very rough sea but fixing the floor down is a challenge especially as it is very hard to reach the edges through the narrow hatch quite away above. More on that to follow.

The platform is made from a seriously expensive hardwood ply with Lloyds certification for structural use in high risk environments. It is much stiffer than "normal" marine ply, will take higher compression loads and has a 25 year guarantee.

It is made in 2 main sections rather than the three of the previous one and my initial design, with the hatch section removed I should be able to get the larger section in (fingers crossed). 

It is 9mm thick with the beams under 11mm. Other timber is reclaimed mahogany and teak with spacers made from Sapele left over from when I replaced the headlining. Fastenings, retaining pieces, etc. are in marine stainless.

The whole is covered in epoxy rather than varnished for better durability and the beams are screwed and glued together with glass tape bonded over for additional strength. Very much over engineered, I hope.

The hatch is to give access to the new bladder water tank under.

Each strap is strong enough to hold the tank in place - assuming the timber holds which with reinforcement under it should. The forward strap will be secured to the  bulkhead. 

The hole in the platform back right is for the water filler, that front right is for the fuel pipes to and from the engine and the one front left is a breather to hopefully keep the lower section reasonably dry and to help the water  tank expand as its filled.

Installation of this and the new water tank is going to be a long job and if the weather is good will hopefully start later in the week. 

Click here for the next stage.