Saturday, July 16, 2022

Repainting Days 6 - 9

This is the last post of a thread, to start at the beginning click here.

An exhausting week with afternoon temperatures in the high 70's (and it hit 100 in the cabin) painting had to be done early, fortunately humidity at c 65% overnight was well below the maximum (80%) but three starts from home between 04:00 and 05:00s  and one from the RAFYC was tiring.

Even when I started painting at 06:00 well before I was half way through it was very difficult to "keep a wet edge", I was working on strips about 6" wide and even that did not work when I had to move the staging.

After 1 gloss coat.
After 3 top coats with the new boot line.
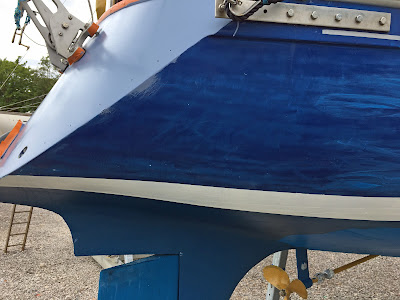
Working on the transom, was difficult!

The port side is not as good although it looks ok from a distance, the perils of painting in a heat wave and in deep shade when you can't see what you have overcoated and what you haven't and the fully thinned paint is too dry to fix in a minute or two. Day 9 was spent refitting hardware, doing the boot line, anti-fouling around the seacocks applying new vinyl graphics and refitting the engine inlet strainer and hose work.

Port side after 3 coats. It the weather had been kinder I would have
spent a day rubbing this side down and another day painting but with
temperatures heading to 90 degrees that was not practical and I was
cream crackered. I'll probably have the boat out of the water next summer
for antifouling which would be an opportunity to rub down and re-coat.

The rubber bumpers on the transom are to protect
the hull from the mooring lines on my "Trot mooring"
that during the strong ebb tide lie across the stern. 

Providing the Seacock is finished in time (it was delivered with the wrong handle and the replacement smaller butterfly type has not yet arrived) she will be relaunched on Wednesday the 20th which at the time of writing should be the first day with more reasonable temperatures - but still c 75 degrees.  I'll then go back to the few jobs I was meant to have been doing before the seacock incident ahead of my next cruise scheduled to start on the 5th or 6th August.

Launched, rather later than the yard planned but
good for getting onto the mooring during the first
stand. Although that got complicated as someone
had parked on my mooring, the second time this year
 and I have only been away once! Fortunately, the
operator of the moorings found me a spare.

Friday, July 8, 2022

The travails of Seacock replacement

The new composite 3/4 inch sink outlet
With the boat safely out of the water this was meant to be straightforward.

For the sink outlet it generally was, the only real problem for the guy doing it was fairly tight access, I had removed the access door to the compartment which is restricted in its movement by the cooker and the heater outlet which proved sufficient. 

He removed the old fitting, tidied up the hole and took back the antifouling etc on the outside of the hull and smoothed it flat before fitting the new skin fitting and seacock.

Note that there is no pigment in the glass fibre, Chris Butler the designer believed that not using any below the waterline helped prevent Osmosis, which is unheard of in his boats, at least those used in salt water and not flooded with fresh.

The new seacock lower left, fresh water pump
top right, fresh water filter top left and the
disconnected warm air duct.
The problem was with the failed engine water intake. 

Note the mound of glass fibre around the skin
fitting which is holding the fitting in place.
When the old fitting and the build up of glass fibre around the skin fitting was removed it was found that the hole through the hull was way oversized. 

The oversized  hole, > 1.5" for the engine water inlet .
The Seacock was 3/4" BSP with a reducing elbow to 1/2".
It is not clear why or when this was done, the skin fitting appears to have been recessed and had been modified with an integral mesh strainer partially removed (apart from the large external fitting there is a stand alone strainer near the engine which has not had anything in it since I have had the boat). The skin fitting was held in by the internal fibreglass "mound" and just rested on filler in and around the hull aperture.

To fit a new seacock the hull has had to be "re-laminated", not a simple process and was a days work by the yard - NOT cheap!! 😞

The hole cleaned up and the hull progressively taken back ready
for multiple layers of glass fibre matting to be applied over the
plugged hole

The glass fibre applied before application of a surface filler.
Inside almost ready for laminating with
glass fibre & epoxy.
Re-lamination almost complete.
Fitting the new seacock should now be straightforward. The only problem (hopefully) is that the yard did not have a 1/2" (outlet) seacock in stock and it did not get delivered when expected. Hopefully that will not be long delayed. When fitted I need to treat all of the exposed fibre glass with waterproof primer (International Primocon) then apply multiple layers of anti-foul on the outside and some bilge paint (International Danboline) on the inside then refit the strainer and hoses.
It took a while and I am still missing the compact butterfly handle
but it was finished on Wednesday 20th, just before re-launch.
Unfortunately, this was not an end to my problems as explained in my post "I really, really did not want to do this".

Repainting Days 3 - 5.

The raised boot line with one coat in each colour done on days 1
and 2, additional coats will go on when I do the area around the
sea cocks and some work done on the fin before one coat all over.
Most of the damaged areas are now under the boot line.
After adjusting the boot line the next job was removing hardware that would get in the way such as the clam shell covers over the anchor locker drains, then rubbing down and masking up. I also took advantage of an overcast day to get undercoat on the transom which will always be in direct sun, the port side I can paint in the morning when it is in shade and the starboard side about lunch time. The damaged areas above the boot line also got a covering of undercoat to help level them up so as not to show when the job is finished. That took a day and a bit.

Working on the transom was a bit of a problem, this did not work
that well as I was working left handed and stretching. I subsequently
borrowed a large bulk of timber > a foot square to stand on which
was a bit easier when I was rubbing down.

A first go with the new International Paints undercoat.
The balance of the forth day was getting the undercoat on, this was International's new combined primer and undercoat "One Up", very thick in the can but liquid with only 5% thinners (max under 25 degrees C is 10%).  I found that coverage and finish was better with the brush than with the roller but with a higher risk of runs or curtains which I managed to avoid on the upper moulding which could not be done with the roller but I did get a couple on the transom in almost out of reach areas.

I rather like this colour and it would be somewhat cooler but the
top coat is not available in this colour and I'm in any case I am
not sure what it would look like in gloss.
Day 5 was a real pain, 8 hours of rubbing down.

Most damaged areas are no longer visible and those that are before
the top coat are only just visible at close range (colour is a
bit off in this picture due to the flash).
A day off tomorrow as the weather looks marginally more favourable on Saturday and Sunday although rather hot, but next week could be even hotter and I need to get two coats on in three days to save rubbing down.

Saturday, July 2, 2022

Repainting days 1 & 2

And long days, at least for me, 10.5 hours on the job after an hour and threequarters traveling down on Friday and 7.5 hours plus the return trip today after staying at the RAFYC overnight to limit travelling to about 15 minutes each way.

The damage is not as bad as it first appeared although it still requires a full repaint which was confirmed by a pro working on the next boat. 

Firstly the damaged is fairly localised and the power washer exposed most of it, I was able to peal and chip off more, mainly on the smaller areas, but the the rest of the paint close to the waterline was still firmly attached.

Secondly the pin pick bubbles / blisters and holes visible just above the boot line only penetrated the very thin top coat - so thin that if you press moderately hard 320 wet and dry used wet goes through the top coat in about three strokes. It would appear that the weed got that far before I was able to get it off and the holes were not big enough for water to make things worse.

Given both of these I was able to give up a possible approach of stripping a 3 - 4 inch band the length of the boat just above the boot line and be a more targeted which saves a lot of time as although the top coat is thin and some of the undercoat & primer not well attached where it is attached it is a devil to get off and very difficult to get a clean edge.

To hopefully stop this happening again the boot line needs to be raised (again) and given it is already too wide that means the bottom has to come up as well as the top. Specialist power tools would help but I don't have them.

The jobs in this session were to clean off as much crud as possible from the topsides, take the edges of damaged areas back to sound paint and prepare the gloss above the boot line for priming whilst removing any pin holes in the top coat or further down. The damaged areas and the area under the new boot line then have to be primed and the damages areas given multiple undercoats to bring the level up to the existing gloss. During this sesson I did not prepare the entire topside for painting due to time constraints and instead spent some time on the boot line - that will need multiple coats on the top to give protection and on the bottom for the blue to effectively cover the white. Although each coat does not take long the masking is a pain. When finished the entire underwater section will get a coat of antifoul to match things up and, with the three coats given last winter, should last me through next season hopefully saving a lift out and block off this winter.

Port side forward as damaged pieces tidied up and the strip above
the old boot line prepared for priming.
Port side aft at the same time. The bare looking patch in the boot
line was probably caused by something I hit in the earlier in the
year, it might have been a particularly sturdy pot marker but
it was dark at the time and although on deck I could not see
it in the dark (this was not the pot markers I became entangled
with in the dark of St Ives.
And the other side.
The floor mop is very handy for cleaning the topside from ground
level and the bottom from the dinghy.
Raising the bottom of the boot line, 1st coat. The top is masked
ready for a coat of Primacon with gaps to allow for priming the
damaged pieces most of which will end up under the anti-fouled
boot line but with small bits above. Some but alas not all of the
irregulates in the line were removed after the pic but before painting,
 hopefully it should be correctable on the next couple of coats.
The area above the boot line and the damaged areas are now primed and a first coat of white antifoul applied to the boot line but I omitted to take pictures before leaving.