Tuesday, October 24, 2023

Memories, good and bad.

Back in late 1977 I joined Brian & Pam Saffrey-Cooper's crew running the front half of his Contention 30 "Buccaneer", that however was not the end game. That autumn there were meetings including one very long and late one at The Chequers Inn, Lymington, with Doug Peterson one of America's leading yacht designers, to finalise the design and layout of a new 1/2 tonner to be built for Brian (AKA "Hooter") by the Elephant Boatyard at Bursledon. Brian was a timber importer so she was built in the finest Western Red Cedar on Sitka Spruce and was very light but strong.

She was launched just before Easter, but a major problem cropped up in trying to find a name for her; Brian, who was rather superstitious and liked to have boat names ending in "eer" as in Buccaneer and his previous 1/2 tonner, a Norlin designed Scampi  "Racketeer" (not that good a name for a businessman!). The crunch came when a name had to be found to get the boat measured for her rating, they passed a pub called "The Green Dragon", green was Brian's lucky colour and already chosen for the hull colour so the name was decided.

Green Dragon on the way to winning our division
in the Round the Island race 1979. I am sitting out
waiting for the next sail change.
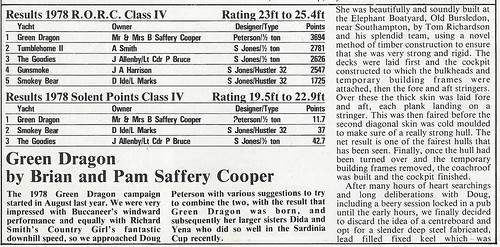
Although we did not manage to achieve our goal of winning the 1/2 ton cup, either at Pool in 1978 or in Scheveningen in 1979 when we suffered rudder failure, or even to come out as top UK boat in those events, but we did win the selection trials from 50+ competitors in 1978 (which was an off year for the Admirals Cup) and finished 7th in the event from 50. Overall she was the most successful British 1/2 tonner in 1978, 1979 and 1980 (I did not sail on her in 1980 but returned to help Brian get his one tonner "Dragon" into the winning Admirals cup team in 1981). She won the division in RORC, Solent Points and British Level Rating Association series in all three years - believed to be a first. We also won the RORC yacht of the year award in 79.
My favourite headline from 1979. Bob was a little biased, he
crewed for Brian & Pam on Racketeer, I think his introduction
to offshore sailing after very successful campaigns in dinghies
and crewing for Reg White winning the Little America's cup
for "C Class" Catamarans.
Then about 5 years ago, after I got my own half tonner as a gift to myself on my second retirement, Green Dragon was run down on her mooring, this from Doug Peterson's office after I shared the picture on Facebook (neither Brian or Doug lived to see her demise):

Then to cap it all she sank and last year(?) these pics came out.:


Such a shame to see such a beautifully made boat end up like this.

1978

1979

Monday, October 23, 2023

Installing a holding tank - Design.

With the slope of the hull and the web
supporting the aft lower shroud fitting
there is not a lot of room behind the toilet
and none under. Securing a sometimes
heavy tank would also be difficult.
To be more environmentally friendly and to avoid some trips ashore for "comfort breaks", I have been toying with the idea of a black water holding tank for several years but its not easy because of space constraints. 

Older boats are not required to have holding tanks in most jurisdictions, regulations vary by country but generally waste can be discharged when more than 3 miles offshore, perhaps unsurprisingly (in 2023) there are no restrictions on discharging waste in UK coastal waters although many marinas and harbours have local regulations or by-laws banning discharges.

The space behind the toilet could take a tank but to be anywhere near a useful size it would have to be bespoke and therefore very expensive, it would also be difficult to fit to the sloping hull, difficult to plumb in and I would loose some small but handy storage space for toiletries and loo cleaner. 

Underneath what was the port berth in the forepeak or under the port berth in the saloon would both easily take a rubber tank but they are difficult to secure and I don't fancy a rubber tank full of sewage anywhere in the boat. Again solid tanks would have to be specially made and both options would require lots of expensive plumbing with diverter valves, pump, etc..

More realistically with the forepeak no longer having berths, a tank could be installed there on the port bulkhead next to the heads. 

If the tank bottom is high enough above the waterline and the pipe work reasonably short and not too bendy this could be emptied overboard by gravity and, with the appropriate fittings, optionally by pump out. 

Again space and cost are issues; an excellent vertical tank is made by "Tek-Tanks" it is made to order in standard sizes with inlets and outlets positioned to order. There are problems, space is at best barely adequate for the smallest 40 litre version, there might not be sufficient "head" for it to drain correctly, and the tank without hose tails is £389. A similar but much cruder design by Nuova Rade is only £159 but again it would be difficult to fit and drainage could be an issue. Both options could be made to work with a lot of plumbing and a pump to drain the tank as sea but it gets expensive and complicated.
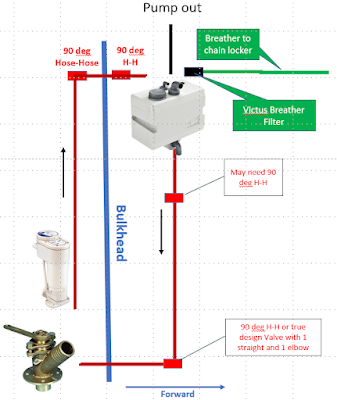
Schematic of the planned installation.
I gave up on the project the last couple of winters but this year I found a 25 litre horizontally orientated tank by Vetus that is much shallower so gives more space for installation above and below and a better head for drainage, still £270 but unlike the other tanks that does included all the hose tails bar one.

The height for gravity drainage looks to be OK even if a couple of elbows are required, especially as the electric pump and Macerator does a better job of breaking up solids and paper than a manually operated toilet.

When offshore the seacock is left open and waste goes straight out, in sensitive areas the sea cock is closed and the waste accumulates in the holding tank later be released at sea or pumped out.

If in use the gravity drainage proves not to work there is room to install the new Henderson Mk5 pump I happen to have (its a long story) between the tank and the seacock. That would be a pain at sea requiring manual pump outs but it would work and I could add a diverter valve and additional pipe work.
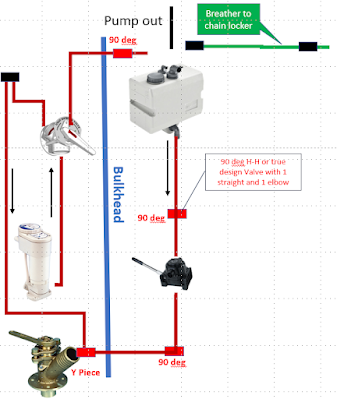
The back up plan (see next post for an updated final version).
Outline plan for the bulkhead mount.
Most of the components are on order and should be here by early next week, the rest I'll get locally some after trial fits, and I'll start the installation when there is some decent weather to visit the boat.

Sunday, October 22, 2023

Installing a holding tank - Installation, Day 1.

I'm glad that I did not try using a 40 litre tank or even the 25 litre vertical, at best it would have had very complicated pipe work, needed new and tricky to build head lining and would probably not have self drained properly. 

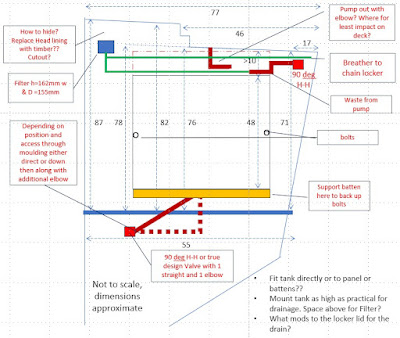
The bad news was that due to a number of factors, mainly positioning of the filter and the length (depth) of the deck fitting for pump out, I had to put the tank lower than I had hoped so gravity draining was still going to be problematic and would probably not have worked at all on starboard tack so I switched to "plan B" and am fitting a pump, diverter valve and a stop valve between the tank and the discharge pump. The existing inlet pipe work and the anti-syphon loop can be reused without modification which will save some time and money.

The end of a long days work (finished at 19:00),
the pipe to the filter needs a clip to hold it up so it
would drain back to the tank if any water got in.
Apart from that I made good progress, 

  • The panelling in the heads is out and most of the black mould behind removed, the rest will go when I have moved some pipework.
  • The tank is mounted with a substantial block underneath that is bolted through the bulkhead to support it.
  • Inlet connected at the tank end and taken through to where the diverter will go.
  • Vacuum pump out piping completed, the head lining hides the deck fitting and just needed a small piece taken out on the aft edge for the pipe to go through. 
  • The filter is fitted to the bulk head and the inlet pipe fitted, it is close to the head lining but to change the filter the headline can easily come down, its held up by Velcro, and there is oodles of space above (where I had thought to put the filter).

The pump will go under the former port bunk, I have it home and it's now fitted to a mounting board ready to install. The locker lid has been shortened to open past the tank, the off cut will go back in with the waste pipe going through it. I'm now waiting for the diverter valve to be delivered and I should be able to finish the job in another long day.

The main problem fitting the tank lower was difficulty in siting the
pump out fitting to get the pipe to the tank without interfering
with the inlet pipe or getting in the way. In the end I put it on the edge
of the coach roof rather than on the deck. Further inboard would have
given a good lead but then there would be nowhere to put the filter
with the bottom of the unit and pipes above the tank and outlet in
the chain locker.
The fitted unit, I was quite pleased with the neat fit to the
Treadmaster anti-slip pad.

As fitted.


Installing a holding tank - Installation, Days 2 & 3

It was a bit of s struggle getting hoses on, even with lots of hot water, but I got there in the end.

There is a "Y" junction bottom left leading to the
seacock,  the holding tank outlet pipe going behind
the bowl, the direct outlet is waiting to be cut and
connected to the diverter via the anti-syphon loop.
The green pipe is for the automatic bilge pump
Getting the diverter straight and fixed to the panel
was the biggest struggle mainly due to lack of
room plus stiff pipes and pipe connections that
would not rotate (with jubilee clips slack).
The finished job. The board left is a drop down table,
rarely used now that I wear a beard so don't need it
shaving using the mirror out of picture right. If I
venture into the Baltic or some other areas I will
have to put an eye on the panel to "lock" (probably with
a cable tie) the diverter to feed to the tank as is required
in places to prevent an accidental discharge.
The holding tank and filter fully plumbed in, the breather goes
to the chain locker as there is insufficient freeboard to put it
through the hull without a high risk of getting water in the filter.
The Henderson Mk 5 pump in position with the ball valve left.
All plastic components are by Trudesign, the seacocks are genuine
bronze (not  DZR Brass)  by "Blakes". The pump is capable of
emptying the tank in less than 30 seconds. Lots of jubilee clips,
 doubled for all connections below the water line or hidden are
needed for piece of mind and to keep surveyors and insurance
companies happy.
The hatch, installed when I converted the forepeak to a wet area
had to be butchered, I can still get my spare washboards in the
locker but I'll have to find somewhere else for the spare tiller. For access
I'll need to keep this area reasonably free of obstructions so things I might
 need quickly or regularly are going to live in the locker.
All together it took about 3 days but I had the advantage of my work some years ago replacing the original vanity unit and installing panelling and the electric conversion to the toilet.

Servicing the clean water input side of the unit,
the output side was not as straightforward.
As I was working in the area a deep service on the 5 year old macerator seemed to be a sensible idea, unfortunately it as not straightforward; two slot headed machine screws were unmovable, I ended up bringing it home, drilling off the heads, disassembling, bending the 650mm M5 machine screws through c 90 degrees and using the bend to get leverage to free them after applying lots of penetrating oil. 

Fortunately nothing was damaged so it only cost a couple of bolts, lots of swearing, several hours and a "wasted" visit to the boat when I tried to do the service whilst on board.

Friday, September 29, 2023

ABC 2 - The Crinan Canal and the Clyde Puffer

The second of what may be an occasional series for "ABC" the Magazine of the parishes of Chesterton, Little Chesterton, Middleton Stoney and Wendlebury. Jan 2024 edition. With some additional pictures.

My track approaching and through the Canal in 2021.

Entering the Canal at Crinan.
I was storm bound in the Port Ellen marina Islay, had failed to reach St Kilda and was too late to get to a sailing event starting in Wales, so I decided to compensate by going through the Crinan Canal, a trip often recommended.

The canal runs for 9 miles between Crinan and Ardrishaig providing a short cut avoiding the often dangerous Mull of Kintyre, easing the trip between Glasgow, the Scottish islands and the coastal villages. 

The route was surveyed by James Watt in 1771 and built between 1794 and 1801 at a cost of £11m in today’s money, it opened in 1809 after being bailed out by the government following problems with the banks and a poor water supply. 

The canal can accommodate boats up to 88ft x 20ft with a freshwater draft of 8’ 10” (saltwater draft of about 8’ 5”), less in dry weather.

Steam vessels started to use it in the 1850s, the most common type in the late 1900s would become the Clyde Puffer; those of a certain age may remember the BBC series based on the short stories of Neil Munro, “The Tales of Para Handy” the devious skipper of the Puffer “Vital Spark”. 
Clyde Puffer VIC 32 (right) in the Crinan basin of the canal.
Originally the type was used only in fresh water, mainly the Clyde and Forth canal, and did not have condensers, steam went straight to the funnel which resulted in puffs of steam and smoke and a puffing sound. The name stuck when condensers were installed to recirculate fresh water so they could be used at sea. These vessels, a generic type rather than a standard design, made a huge difference to communities in the Islands and elsewhere, especially those without a good harbour. Flat bottomed, the Puffers would be beached on a falling tide and using their own derrick offload supplies and load with products to be exported then float off on the next tide.

During WWI Puffers were used to supply warships and in 1939 the navy needed more self-powered lighters to service the fleet. Rather than design anew, to avoid using major shipyards and for quick results the existing Puffer designs were used and orders placed with numerous small yards many of which had experience building them. Over 100 were built and were known by their VIC (Victualling Inshore Craft) number. Most of the surviving Puffers have had their steam engines replaced by diesel engines, VIC 32 pictured above in the canal is one of the few retaining the original coal fired steam engine.
Passing the second swing bridge after leaving Crinan.
Now canal staff operate the modern powered gates of the locks at each end of the Canal and the seven bridges, apart from that you are on your own to operate the eleven manual locks. That requires two people (now three are mandated if you don’t have a “Pilot”), one on the boat and one ashore. Being single handed I hired a “Pilot” who took and cast off my mooring lines, operated the lock, then went ahead on a push bike to do the same on the next lock.

In Lock 13 heading east and waiting for a boat in lock 12 coming
the other way.
The full story of this trip anti-clock wise around GB starts here, the passage through the canal with more words and pictures is here

Thursday, September 28, 2023

Why did the RYA drop splicing from the sylabus?

Years ago we taught basic splicing of 3 strand rope and basic whipping as part of both the the RYA dinghy and offshore syllabuses.

But no longer, and I have never really understood why. 

I just made up a new rope - chain - rope bridle, the rope to chain splices are the easiest there are and the eye splices are not much harder, by using a reel-end of 16mm rope (and 1 metre of new 10mm grade 40 chain) I saved about £90 or more than two thirds of the cost of buying it made up.

A rope - chain - rope bridle, ideal for mooring to a buoy with 
a ring or chain on the top or to a pile. The break load is over 5 tonnes.
Chaff protection at the fairleads will be added when I go to the boat. I
also have one with 8mm chain
that is easier to set up, especially
through chain.
Splicing braid on braid rope is more complicated but quite satisfying to do once you have cracked it and given the number of splices on a boat can save a lot of cash.